
Your cart is empty!

Before we begin..
Thanks for choosing to reuse your old t-shirts!
First thing's first - this is not an exhaustive instructional list. It is a complimentary recipe to our on-line workshop (currently playing - feel free to hit pause at any time). You can also view it at our RGQ TV Youtube channel.
What we love most about t-shirt jewellery is that from one piece of clothing you can make:
-
Necklaces
-
Braceletes
-
Earrings
-
Reusable bags
-
Pet toys
-
Hair accessories
-
Belts ... and so much more!
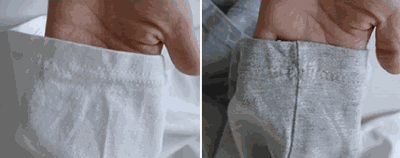
Picking the right t-shirt for your yarn
Any t-shirts will do for up-cycling BUT the most ideal t-shirt for making yarn is a plain tubular (i.e. no side seams) t-shirt with minimal graphics.
|
|
| L - tubular ; R - side-seam (image from Blank Tee Shirts) |
Making your t-shirt yarn
-
Place t-shirt on a flat surface
-
Cut a straight line parallel to the hem from the sleeve bottom to sleeve bottom.
-
Cut off the hem
-
Fold shirt in half length-ways with side sitting about 2cm lower than the other
-
Rule up the shirt into 2cm intervals parallel to the original hem
-
Cut along the lines and through first fold only stopping about an inch from the top fold
To make a continuous thread of yarn:
-
Open up shirt at the side, which now looks a bit like a paper lantern
-
Start the yarn by cutting the first row diagonally across to the raw hem.
-
Move the cut line from opposite row to opposite row so that one continuous strip is created.
-
Once your shirt is cut into a continuous length, pull the strip, grabbing in foot-long lengths, so that it curls on itself.
Your t-shirt yarn is complete!
We recommend also watching this short step-by-step tutorial by needlepointers.com on DIY t-shirt yarn.
Construction techniques and tips
Most of our recommended construction techniques won't require sewing. However, if you'd like to have a clean finish to your jewellery and accessories, then a needle and thread will come in handy.
BINDING
Binding is a handy technique to taper off chunky pieces, join loose ends together or add a block colour accent to your jewellery. Technique-wise it is very easy to master - it's quite like wrapping a bandage on a limb. The tighter you bind the yarn, the stronger it will be. The tighter you knot it off at the end, the longer it will stay in place. Binding is a good example of where a quick stitch will neaten off the finishing to your piece.
PLAITING
As t-shirt fabric is typically stretchy, the best plait is a tight plait. Another point to note is that the more colours you'd like to add, the thicker the plait will be.
MACRAME KNOTS
There are a number of basic knots you can do for macrame jewellery. We’ll be showing you the square knot. In our online workshop, we used only 2 pieces of t-shirt yarn to create the macrame key ring, which was created using the square knot technique:
Thread 1 was tied off with a lark's head to the key ring base.
Thread 2 was looped around the back to represent to two outside threads (green & blue lines from the square knot diagram)
For one colour, both outside threads should be the same colour
For two colours, the outside threads should be different colours. The two middle threads will slowly be covered in a square knot pattern.
(Images from https://www.thepapercraftpantry.com/blog/tag/macrame)
TASSELS
Up-cycled t-shirt tassels can be turned into earrings, a pendant for an existing piece of jewellery, or embellishment to your accessories.
To make your tassel:
-
Cut shorter strips of yarn approx. 5-10cm
-
Fold the strands in half
-
At the fold point, take another strand (ideally in the same colour) at tie the bundle at the fold.
-
To form the 'key hole' at the head of the tassel, take another strand (again, in the same colour) and tie it at the base of the 'key hole'.
Zero-Waste Goals - making the most of your off-cuts
What to do with your sleeves?
As much as we love t-shirt yarn, sleeves are an unnecessary off-cut. Here’s a 10-minute solution that will transform those sleeves into a practical pair of draw-string pouches. Try it!
|
|
What to do with your collar and yoke?
When odd-shaped pieces reach the 'off-cut' pile it's because we aren't able to reimagine them in another function. If you've reached this point, then the best tip we can give you is to not over think it. For example, t-shirt off-cuts are perfect for reusable cleaning rags.
Otherwise, if you're a sewer, who also has old towels piling up, why not combine the two and up-cycle them into bibs. Try it!
|
|
-
To make a continuous thread of yarn:
-
Open up shirt at the side, which now looks a bit like a paper lantern
-
Start the yarn by cutting the first row diagonally across to the raw hem.
-
Move the cut line from opposite row to opposite row so that one continuous strip is created.
-
Once your shirt is cut into a continuous length, pull the strip, grabbing in foot-long lengths, so that it curls on itself.
Your t-shirt yarn is complete!
We recommend watching this short step-by-step tutorial by needlepointers.com on DIY t-shirt yarn - https://www.youtube.com/watch?v=oqyhNDSXEfg